How to Print with HT Clear Filament: A Complete Guide for Stunning Transparent 3D Prints
Printing with transparent filaments opens up a range of exciting possibilities in 3D printing, from prototyping lenses and light covers to creating artistic pieces with unique visual properties. ColorFabb’s HT Clear filament is one of the most advanced options for achieving high-transparency prints, designed to deliver durable, heat-resistant, and near-transparent results. However, working with clear filaments requires careful setup, precise settings, and post-processing to achieve the best clarity.
In this guide, we'll walk you through everything you need to know to print with HT Clear filament, including recommended printer settings, best practices, and tips to enhance transparency. By following these steps, you’ll be able to produce stunningly clear and high-quality 3D prints with HT Clear.
What is HT Clear Filament?
Key Properties of HT Clear
HT Clear is a high-temperature, co-polyester-based filament developed by ColorFabb. It combines the transparency of traditional clear filaments with added durability and heat resistance. Unlike standard transparent materials like PLA, HT Clear is engineered to withstand higher temperatures, making it suitable for applications that demand both clarity and resilience.
HT Clear is also known for its excellent chemical resistance and impact strength, which makes it a great choice for both functional and aesthetic applications. The filament’s unique formulation allows for minimal yellowing, so you can achieve high-clarity prints that maintain their transparency over time.
Benefits of HT Clear Filament
- High Transparency: HT Clear offers exceptional transparency, allowing you to create parts with a glass-like appearance.
- Heat Resistance: This filament can withstand temperatures up to 100°C, making it suitable for applications requiring thermal stability.
- Durability: The co-polyester base provides impact strength, making HT Clear tough and durable.
- Chemical Resistance: HT Clear resists various chemicals, adding to its utility in industrial applications.
- UV Stability: Compared to other clear filaments, HT Clear is less prone to yellowing over time, which is ideal for long-lasting, transparent prints.
Ideal Applications for HT Clear
Due to its clarity, durability, and heat resistance, HT Clear is ideal for applications such as:
- Light Guides and Covers: Perfect for parts that need to diffuse or guide light effectively.
- Prototyping Lenses and Optical Components: Allows for prototyping clear parts that require high transparency.
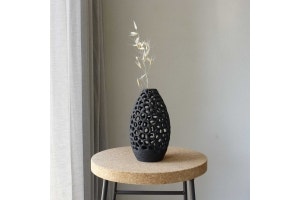
- Decorative and Artistic Pieces: Suitable for sculptures and decorations that emphasize transparency.
- Protective Covers and Cases: Adds a clear, durable layer of protection while maintaining visibility.
- Industrial Components: Components requiring both strength and visibility, such as fluid flow monitoring parts.
How to Print with HT Clear Filament
Printing with HT Clear requires specific settings to optimize transparency and strength. Achieving a clear, glass-like print involves using the right temperature, speed, and layer settings. Below, we outline the best practices for getting the most out of this filament.
1. Printer Setup
All-Metal Hotend
HT Clear filament requires high temperatures for optimal printing, often between 250°C and 280°C. Using an all-metal hotend is essential, as PTFE-lined hotends are not designed to handle these temperatures and may degrade over time.
Heated Bed
HT Clear adheres well to a heated bed, typically set between 100°C and 110°C. A stable, heated bed helps prevent warping, ensuring the first layer adheres properly for a flawless foundation.
Print Surface
For best results, print on a glass bed coated with a thin layer of glue stick or an adhesive suitable for high-temperature filaments. Glass provides a smooth surface that enhances the clarity of the bottom layer, contributing to a more transparent print.
2. Optimal Temperature Settings
Extruder Temperature
The extruder temperature should be set between 250°C and 280°C. The higher end of this range typically improves layer bonding and clarity, but it may vary depending on your specific printer model. Start at 260°C and increase if you observe under-extrusion or poor layer adhesion.
Bed Temperature
A bed temperature of 100°C to 110°C helps to prevent warping and ensures proper adhesion of the first layer. Using a consistent temperature throughout the print will lead to better dimensional accuracy and reduce the chance of separation or lifting during the print process.
3. Print Speed and Retraction Settings
Print Speed
For clear filaments like HT Clear, a slower print speed is essential to maintain transparency and avoid imperfections. A speed of 20-40 mm/s is recommended. Slower speeds allow the filament to flow more evenly, resulting in better optical clarity and fewer bubbles.
Retraction Settings
Retraction can create micro-bubbles within transparent filaments, reducing clarity. Set a minimal retraction distance (1-2 mm) and a low retraction speed (10-20 mm/s) to reduce these bubbles. In some cases, disabling retraction altogether may improve the final transparency, especially for single-shell or vase-mode prints.
4. Layer Height and Extrusion Settings
Layer Height
To maximize clarity, use a larger layer height, such as 0.2 mm or even 0.3 mm. Thicker layers reduce the number of internal surfaces that light must pass through, resulting in better light transmission and transparency.
Extrusion Multiplier (Flow Rate)
An extrusion multiplier of 100% is typically optimal. Avoid over-extrusion as it can lead to a cloudy appearance due to the excess material creating internal distortions. Fine-tuning the flow rate for your specific printer may be necessary to achieve the desired clarity.
Tips for Achieving Maximum Transparency with HT Clear
- Single-Wall Printing (Vase Mode): Printing in vase mode (spiralized contour) can greatly enhance transparency, as it eliminates internal seams and layer lines that scatter light. Use this mode for artistic or decorative items that don’t require internal infill.
- Use High-Temperature Environment: If possible, print in an enclosed printer or a controlled environment to maintain consistent temperature and reduce drafts, which can affect transparency and layer adhesion.
- Avoid Fan Cooling: While cooling fans are essential for PLA, they can cause cloudiness in HT Clear prints. Turn off the cooling fan or keep it at a very low setting (10-20%) to prevent rapid cooling, which can lead to internal stresses and reduced transparency.
- Dry the Filament: HT Clear, like other co-polyester filaments, is hygroscopic, meaning it absorbs moisture from the air. Moist filament can produce cloudy prints with visible bubbles. Dry the filament before printing by placing it in a filament dryer or an oven at 60°C for 4-6 hours.
Post-Processing Techniques for Enhanced Clarity
Post-processing is key to achieving a glass-like finish with HT Clear filament. Here are some methods to improve clarity after printing:
Sanding and Polishing
- Sanding: Start with a coarse grit sandpaper (400) and progress to finer grits (up to 3000) to smooth out any visible layer lines. Use wet sanding for a smoother finish and to avoid overheating the material.
- Polishing: After sanding, use a polishing compound to bring out a clear shine. Apply the polish with a microfiber cloth, using circular motions until the surface achieves a glassy appearance.
Chemical Smoothing
Chemical smoothing is generally not recommended for HT Clear, as common solvents like acetone do not work effectively with co-polyester filaments. However, a clear epoxy coating can provide a similar effect, adding a glossy finish while protecting the print.
Clear Spray Coat
Applying a clear acrylic or polyurethane spray can enhance clarity and add a protective layer to your print. Use multiple light coats rather than one heavy coat to avoid drips, and allow each layer to dry fully before applying the next.
Troubleshooting Common Issues with HT Clear
Issue: Cloudiness in the Print
Solution: Cloudiness often results from improper temperature settings or moisture in the filament. Ensure the filament is dry, and try increasing the extruder temperature slightly. Reduce fan speed to minimize rapid cooling.
Issue: Bubbles Inside the Print
Solution: Bubbles are usually caused by moisture in the filament. Make sure the filament is completely dry before printing. Lowering the retraction speed and distance can also help reduce bubbles.
Issue: Warping or Poor Bed Adhesion
Solution: Set the bed temperature to 100°C-110°C and make sure you’re using an adhesive if necessary. Adjust the first layer height to improve adhesion, and consider adding a brim for larger prints.
Issue: Stringing and Oozing
Solution: Adjust retraction settings, but avoid high retraction speeds and distances, as these can create bubbles in clear filaments. Lower the print temperature slightly if stringing persists.
Recommended Slicer Settings for HT Clear
For slicers like Cura, PrusaSlicer, or Simplify3D, use the following settings as a starting point and adjust based on your printer’s specific requirements:
- Extruder Temperature: 250°C - 280°C
- Bed Temperature: 100°C - 110°C
- Print Speed: 20 - 40 mm/s
- Layer Height: 0.2 mm - 0.3 mm
- Retraction Distance: 1 - 2 mm
- Retraction Speed: 10 - 20 mm/s
- Cooling Fan: Off or 10-20%
- Extrusion Multiplier: 100%
Printing with HT Clear filament requires careful setup and precise settings, but the results can be extraordinary. By following these guidelines, you can produce transparent, high-quality 3D prints that showcase the full potential of ColorFabb's HT Clear. With patience, practice, and attention to detail, you’ll achieve crystal-clear prints that stand out for their clarity and durability, opening up a new realm of possibilities for your 3D printing projects.